|
|
|
|
| ||||||||||||||||||||||||
|
Become a Patron! |
Art tips and techniques, reviews and interviews from my studio. Archived here and at World Famous Comics. Comics 101 for 12/27/2001 The Art of CCG Illustration Week Two: The Stages of 'Rage' 1) This sketch (Ex.A) is my initial concept design for the following art notes I received from my art director... 'Card #889-g Show a drunken garou (nasty loooking werewolf) standing at a bar with a large mug of beer in his hand. He wears an eyepatch over one eye.' 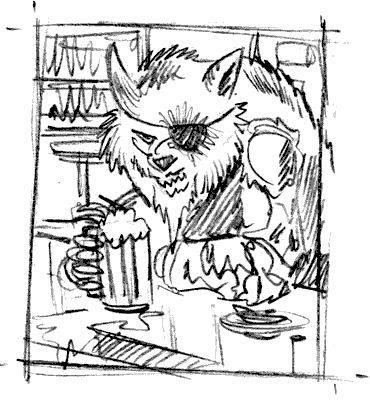 Example A 2) The following illustration (Ex.B) is the completed line art I created in pen and ink after my initial sketch was approved. This artwork is completed at just over 6 by 8 inches though I'm keeping in mind it will eventually be reduced to around 2 by 3 inches for the final printed piece. 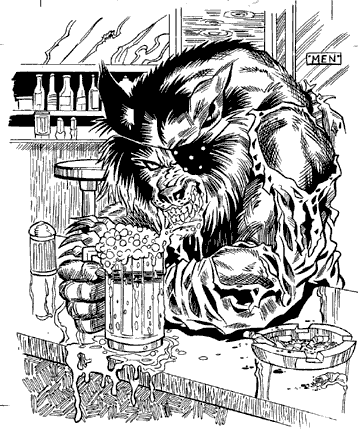 Example B 3) At this stage, I scan the pen and ink artwork full size into my Macintosh computer as a 300 d.p.i lineart document. Opening this file in Photoshop, I touch up some of the inking and clean parts of the drawing in general using the eraser tool. I crop the artwork and convert it to a grayscale file before saving it as a RGB color Tiff file. After closing out of Photoshop, I reopen the artwork in Painter and then click the 'Edit' menu option and drag down to 'Mask' and then highlight 'Image Luminance'. This masks my black line art. Before I begin painting and rendering behind the black line though, I have to go down the bottom left hand corner of my window and click and drag from the 'brown' drawing mask icon to the second one that shows the drawing icon masked in the center. Now I begin rendering my illustration using the various brushes in Painter. In my 'Brush Control: Size' window, found in the Brushes pallette, I can change the angle, squeeze and tip of my brush to achieve various strokes and effects with the paint. Some of the other tools I use in completing the rendering on this werewolf are the 'Dodge' and 'Burn' tools. These tools can be found in the Brushes pallette in Painter and I use them to lighten and darken the tones of the werewolf's fur and clothing. I adjust the opacity of my paint and size of my brushes also using my 'Options' pallette in Painter. Finally, the artwork is now finished (Ex.C) and I save it to a zip disk to fed-ex to my art director along with the rest of the cards I completed for this set. 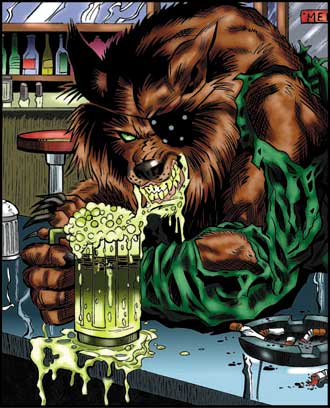 Example C 4) Once the artwork is sent to my art director it's formatted for the final layout design in-house and sent to the printer resulting in the final image (Ex.D). 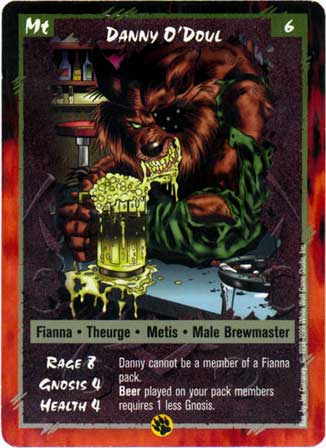 Example D Next week we'll take a look at my artwork and creation process for the fantasy collectible card game, Age of Empires. -Joe Recent Columns:
© 2024 - , 153 Sheffield Way, Sandusky, OH 44870 All other ® & © belong to their respective owners. | ||||||||||||||||||||||||