|
|
|
|
| ||||||||||||||||||||||||
|
Become a Patron! |
Art tips and techniques, reviews and interviews from my studio. Archived here and at World Famous Comics. Comics 101 for 10/25/2001 White Wolf - Werewolf: Storyteller Cover! Week Four: A domain of evil it Is. Into it you must go. I open the rendered line art file in Photoshop and select the entire image by going to my 'Select' menu option and clicking 'All'. I then go to Edit and 'Cut' which removes it from the background canvas of my file. I go to my Layers pallette and create a new layer by clicking the small arrow on the right and dragging down to 'New Layer'. This is called Layer 1 in the pallette. I then I go to Edit and 'Paste' which places my artwork above my white background while my new Layer 1 is still selected. To check and make sure I placed my rendered artwork on a layer above, I can simply check my layers pallette window or click the 'eye' icon next to the appropriate layer to see if the artwork can be made invisible or visible for that layer. With my artwork on Layer 1, I want to select the negative white spaces with my Magic Wand tool while holding down the 'Shift' key. Holding Shift while I click allows me to group the my selections together. With all of the negative white space selected, even the tiny negative spaces popping through the werewolf's ripped clothing and around the other characters in the foreground, I then hit the 'Delete' key which will eliminate those parts of the canvas on that layer and allow me to see the cave artwork behind it once I place it back there. Now we go back into the cave artwork file. I open the file and flatten the layer of runes artwork to the background cave image. I select the entire image (Select: All) and copy it into my rendered line art file. This automatically places it in Layer 2 above Layer 1 in my Layers pallette. I click on Layer 2 in the window (the flattened cave art) and drag it down behind Layer 1, but above the background layer. This allows me to see the cave and runes through the negative spaces I deleted in Layer 1 around the characters and line art in the foreground. Once I choose 'Flatten Image' from my 'Layers' menu option, I can finish the rest of the rendering with my fully visualized and completed background (Example H).  Example H The Caves Have Eyes The next step for me here is to draw a selection around the entire line art of the eyes in my upper image with my 'Lasso' tool. Then, with this art selected, I go to 'Edit: Copy' and then 'File: New'. This creates a new window in Photoshop for me so on this file I select 'Edit: Paste' which copies my line art of the eyes onto the canvas as Layer 1. Before I close out and open this file to render in Painter, I go to 'Layer: Flatten Image' which drops the line art to the background. I save this file and open it in Painter and after masking this line art as I did with my previous line art, I begin to render them using my oil brushes and air brushes. In some areas, I color the black line art with paint to give the actual eyeballs the illusion of dimension and to make them appear more real and rounded. I do this by easily switching the drawing mask icon in the lower left corner of the window back to the first mask icon and begin painting on top of my black line. I save my work, close out of Painter and reopen the file in Photoshop to add the lighting effects of the fire and lens flares in the eyeballs. In Photoshop, I want to fill the eyes with an amber glow of the fire I drew. I select the white areas of the pupils with my Magic Wand tool while holding the Shift key. I choose a warm orange-red color as my foreground color and a yellow-orange as my background color. I then use my 'Gradient Tool' as I click and drag over my selection (the fire areas of the pupils) and create a linear gradient 'glow' in them. Finally, I make a circular selection one at a time over each colored eye using my 'Elipse Marquee' tool by clicking and dragging with it. For each eye selection, I go to 'Filter: Render: Lens Flare' and choose the '50-300mm' option at 100%. This creates the white glow of each eye and I have now completed the rendering of this step (Example I). 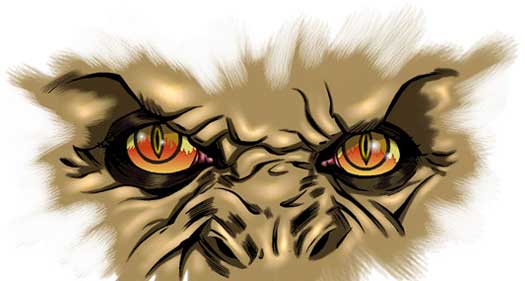 Example I Hopefully you'll return for the final installment of this article next week but don't dare read it...alone! Oh yeah, Happy Halloween! -Joe Recent Columns:
© 2024 - , 153 Sheffield Way, Sandusky, OH 44870 All other ® & © belong to their respective owners. | ||||||||||||||||||||||||